INTRODUCTION
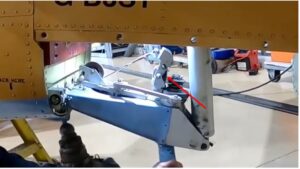
The tail wheel locking mechanism Harvard Mk4
T6 Harvard Ltd has more than a decade of experience, commercially operating a Harvard Mk4 aircraft. As a director of the company, I would like to draw your attention to the below operational information regarding the correct procedures for taxing the Harvard. In addition, this article aims to make the pilots aware of the delicate mechanical linkage in the tail wheel assembly that may be prone to damage if mishandled.
In this article, I would like to discuss the care and procedures surrounding the tailwheel locking mechanism on the Harvard 4, which also accompanies a short video below.
The tail wheel locking mechanism
I have seen plenty of pilot stories referring to flying the aircraft and engineer reports on the care and maintenance of the R1340 radial but rarely do I see anything written about the tailwheel locking mechanism on the Harvard’s and Texans. Yet, surprisingly, if the “Little” pin (roughly 8mm diameter) at the rear shears while landing, its effects may be catastrophic, so I think it’s worthy of more debate and a closer look at how this is a critical mechanism works.
Most of the initial wear leading up to a broken tail wheel locking pin stretched wire cables, or destroyed tail wheel tyres may have been caused simply by continuous side loading of the pin, mainly through lousy taxi techniques over some time and incorrect mechanism unlocking methods or even wrong towing methods.
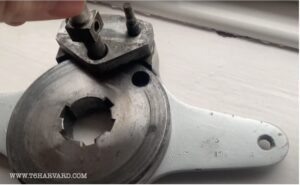
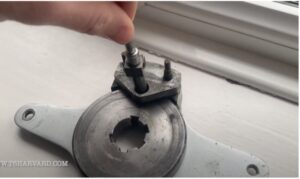 Right (fig 1) – The tail wheel locking pin. This is a lot smaller and more delicate than I had imagined.
In this picture, the pin has been lifted to the point where it is about to disengage from the hole allowing the disc to turn clockwise or anti-clockwise.
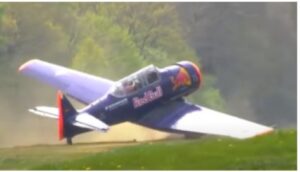 Footage of the consequences of a sheared pin: I have attached a short clip of the Red Bull ground loop in a Harvard/Texan, which ground looped due to a failed tail wheel locking pin – see attached video. The pilot flying this aircraft is one of the most skilled warbird pilots globally; however, even with a sheared pin, the aircraft was uncontrollable as the machine slowed down to a point where there wasn’t enough slipstream going over the control surfaces. – https://youtu.be/Dz2_QJpfqXI
Having completed the 10-hour P-51 conversion course in the USA and having been shouted at about sideloading the pin, I decided to get my head back in the books to see what I was doing wrong! The P-51 tail wheel mechanism is roughly the same as the Harvard, so with 400 hours on the Harvard, I needed to make sure I fully understood what was going on back there and make sure that what I thought was the correct technique indeed was the proper technique with regards to taxing the aircraft without causing a side load on the tail wheel locking pin and the tyre sidewalls. In the above photograph and the accompanying video, you can see that the pin is a lot smaller than most imagine, and the hole that the pin slots into has been worn from a hole to an oval. If this unit hadn’t been inspected and replaced, then the pin may have sheared during taxi if sideloaded, or in the worst-case scenario, it may have failed during landing in a crosswind.
HOW IT ALL WORKS
Left (fig 2) – The red arrow points to the mechanism position with the stick fully forward with the pin fully lifted and disengaged. The pin is entirely out in this state, and the tail wheel is free to castor. The mechanism is almost vertical, held up with tension from the cable resisting the spring tension.
Only by moving the stick aft will the mechanism be allowed to lower the pin towards the locking hole on the disc. The mechanism is spring-loaded to assist its travel down to the locked position.
Causes of excessive wear: The tail wheel locking mechanism parts do wear, and as part of the annual inspection, the engineers should inspect this unit closely and examine it for wear.
For over a decade, T6 Harvard Ltd operated with no issues regarding the tailwheel locking mechanism; however, in a short 12-month period, we noticed an increase in wear to the sidewalls of the tyres, a stretched tail actuating cable for the mechanism and finally, a tailwheel locking pin worn past the acceptable levels of serviceability discovered on the annual check.
Towing the aircraft: severe damage to the tail wheel locking mechanism can be caused if the aircraft is towed without the control lock engaged on the control stick.
Care must be taken to ensure the control lock is engaged and the elevators are locked down. In addition, the tail wheel must be examined during towing to ensure that it castors freely and the locking pin has disengaged. Towing with the tail wheel locking pin engaged due to the control lock not being locked will lead to excessive side loading forces on the tail wheel locking pin and the tyre’s sidewalls. The control lock needs to be engaged before towing to allow the tail wheel to full castor, especially when reversing the aircraft in and out of the hangar.
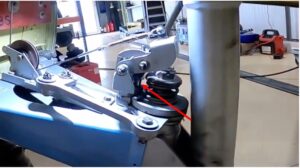 Right (fig 3) – The red arrow shows the pin resting on the disk; however, it hasn’t engaged yet into the hole.
With the stick fully aft and the tail wheel straight, the spring-loaded pin will drop into the hole on the disc as per fig 1 and engage.
 Left (fig 4) – The pin in this photograph shows the position in fig 3 when the pin is resting on the disc under tension, waiting to drop into the hole on the disc and lock.
For this to happen, the stick needs to be fully aft with an up elevator allowing the cable to slacken and the spring-loaded mechanism to force the pin onto the disc, allowing it to drop into the hole when the rudder and tailwheel are straight, and the pin and the hole are aligned.
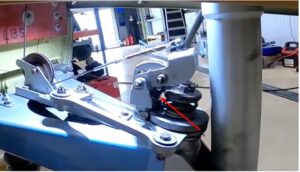 Right (fig 5) – The red arrow shows the pin is now fully engaged as per fig 1. This is only a subtle change from fig 3; however, this is the position once fully engaged.
The tail wheel and rudder are straight, and the pin and the hole have aligned, allowing the pin to drop in and lock.
Braking while turning – Pilots should think hard before using the brakes as they turn with the tail wheel pin engaged; as my mentor in the USA states, “If they are not unlocking the tailwheel for 50% of the turning, they are probably sideloading the pin.”
This is a good point and worth discussing in detail later in this document. I recommend having the stick back when taxiing with the tail wheel locking pin engaged; however, for any turn other than a gentle weave, I disengage the pin with a gentle forward stick. I only do this when the aircraft is entirely straight, so there is very little chance of stretching the actuating cable to the mechanism, and it negates any sideloaded resistance on the pin and mechanism. It is well worth watching the video and looking at the demonstration of how it all works, getting a clear mental picture. More of this later!
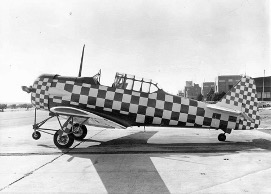 Nosing over the Harvard: The Harvard is a very heavy tailwheel aircraft, and the centre of gravity is further back from the main wheels, unlike the Spitfire. So combined with the heavy tail wheel and aft C of G, nosing over the Harvard on even ground during ‘normal’ taxing and calm winds would be extremely difficult but not impossible. There are plenty of pictures of Harvard’s in military service that have nosed over, and we can assume that these have happened in many cases from heavy braking, uneven ground, potholes etc.
Left – This shows a military training Harvard with a “stabiliser nose wheel’ for learner drivers! They must have adapted this unique airframe for a good reason. So as stated above, a nose over is not impossible, especially with momentum and heavy breaking.
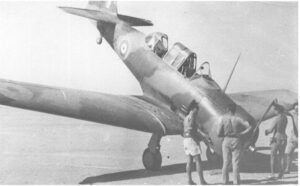 Right – AJ845 (Not AJ841) having a bad day again, showing that a pilot can achieve a nose over if he tries hard enough!
On a side note, I did use this aircraft as one of the research pieces when I painted the Wacky Wabbit. A friend of mine once told me that he used to volunteer for Gary Newman and his radial pair when he was in his twenties. He would regularly get his back under the rear horizontal stabiliser of the Harvard and lift the tail high enough to reach back and kick the tail wheel straight with his foot. Not one to resist a challenge, I tried this being a beefcake and failed to lift the tail more than a few millimetres! This said to me that this was a very heavy tail wheeled aircraft!
Taxi techniques: I never assumed the tailwheel locking pin was engaged before starting the taxi roll. The last pilot that flew it may have parked the aircraft without ensuring that the pin had engaged before shutting down and then putting the control lock on, which should disengage it again. In this case, the pin and the hole should be lined up, and as you release the control lock and hold the stick aft, it should just pop back in.
Alternatively, the aircraft may have been towed out with its tail wheel castoring, and as above, parked up with the tail wheel not fully centred. Hence, as you release the control lock and hold the stick aft, the pin is not aligned with the hole and won’t engage unless the aircraft is taxied forward slowly, allowing the tail wheel to straighten up, allowing the pin to align with the hole and drop in.
As I taxi, having established that the pin has dropped into the hole and engaged, feeling this through the rudder pedals, I continue to taxi with the stick fully aft and only brake gently to stop or slow down using the brakes symmetrically when straight. As I weave the aircraft to see in front, I remain fully aware that any hard weaves or excessive braking will be sideloading the pin and causing wear to the tail wheel tyre, so I always weave with rudder only and my heels firmly on the deck with toes off the brakes.
While weaving, I always try and keep the turns progressive and gentle, only allowing the nose to wander in either direction just enough to see where I am going and not going to full rudder deflection.
Stretched cable: Recently, we have had a stretched wire cable that operates the pin mechanism, clearly shown in the accompanying video. We can only deduce from this that the pin has been under considerable sideload while the pilot has been pushing the stick forward: extracting the pin against a high friction force requires excessive stress in the actuating cable and has thus stretched it.
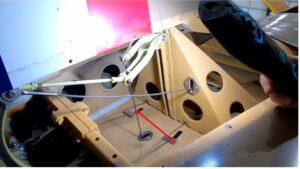 Left (fig 6) The red arrow shows the short wire cable that lifts the tailwheel locking pin through the mechanism. As the sick is moved forward and the elevator goes down, the linkage is mechanically moved up, lifting the cable, and thus lifting the pin.
This can’t be an isolated incident; I guess this must have been done repeatedly to get the cable to go slack. But, again, this is something new and a problem we have not had before. If the stick feels remotely resistive, the pilot must ease the stick back, unloading it and getting the tailwheel straight, allowing the locking pin to sit in situ with no side forces acting on it. Only when the stick goes fully forward with no resistance should the pilot continue to lift the locking pin. I can’t imagine how much force is required to stretch the relatively short wire cable; however, we have managed it!
Turning the aircraft: If I want to turn the aircraft sharply, which is usually the case when I get to the hold and want to turn the aircraft into wind and I can’t get around comfortably with the tail wheel locking mechanism engaged, I ensure that the tail wheel is straight and then I stop the aircraft, apply forward stick gently and feel the pin disengage without having to push the stick forward with force to disengage the pin. Any force at this point is showing resistance and not only causing damage to the pin but stretching the cable that operates the pin. Stretching the cable which is another undesirable effect of a wrong procedure.
As the pin freely disengages, I then taxi forward with the stick forward of centre, pin disengaged, and the tail wheel fully castoring. I then ease the aircraft around on the brakes until I am facing the correct way, then align my tail wheel again by creeping forward. Finally, when I am sure I am straight, I ease the stick back and again creep forward, allowing the pin to drop in its hole without any side loading on the pin.
If you are taxiing forwards and turning with the pin disengaged with stick forward, and then bringing the stick aft while the tail is in full swing, the pin would drop in with a substantial sideways load on the unit and a potential shear at this point. Yes, this has been witnessed!
Heavy turns with the brakes: Engineers at Duxford have seen pilots braking heavily in the turn-on various Harvard’s, not just ours, with the stick back sideloading the pin and the tyre, which would make sense; as our 3-month-old tyre has been written off!
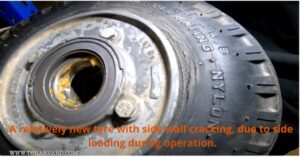 Engineers have witnessed hard braking turns on the tarmac/hard apron and the grass runway and have watched the tail wheel skid on the grass, sideloading the tyre and causing severe damage.
I think this is the leading cause of damage to the pin and mechanism where pilots are turning the aircraft on the brakes more tightly than the tail wheel allows while the tail wheel locking pin is engaged.
It’s unlikely that the tail wheel will skid on the tarmac/hard; however, the forces that might be trying to make it skid could be tremendous so that the real damage will be done more easily on the tarmac. So, my conclusion is that most of the damage to the tail wheel tyre happens this way.
Consequences of a sheared pin: A sheared pin on landing wouldn’t end well as per the Red Bull video – However, more to the point as the operator who pays the bills, any pilot that side loads it so heavily that it shears on the ground would cost the company money and put the aircraft out of action which would cost even more money in lost revenue.
CONCLUSION
 In conclusion, I’m so careful when I taxi the Harvard. When I taxi the Harvard, I have the pin in only when on a long taxi and only do very gentle turns with the rudder and not the brakes. I unhook the tail wheel only when the tail wheel is straight, and there is very little resistance on the stick, and I only engage the locking pin when the tail wheel is straight.
I only allow a very light forward stick pressure when the tail wheel is straight to unhook the pin and take care not to stretch the actuating cable. You can then feel any sideways load that you might be placed on the pin as that force is ‘only’ coming from your feet on the rudder bar, and it doesn’t take very much pressure on the bar to steer that Harvard on a regular taxi.
Points to note:
- When towing the aircraft, ‘always’ ensure that the control stick has the control lock with the elevators locked in the down position. Ensure by the observation that the tail wheel locking pin has disengaged.
- Never move the stick forward to disengage the pin if there is any tension on the stick and cable; ensure the tail wheel and rudder is straight, and there is no side loading of the pin. The tail wheel lock should disengage without the need to overcome more than a slight bit of tension on the stick.
- You may taxi with the stick aft, and the tail wheel locking pin engaged; however, do not use brakes to turn, use rudder only, do not use excessive rudder to turn and keep the turns shallow. Also, keep in mind the side loads on the pin.
- Do not try and engage the pin while the tail is swinging, as this will exert immense pressure on the pin should it engage.
- Do not try and make tight turns with the tail wheel pin engaged, as this will lead to tail wheel tyre side loads and extreme side loading of the pin. This would be exacerbated on the tarmac.
- Make all turns where possible with the tail wheel lock disengaged and the tail wheel castoring. Only bring the stick aft after the aircraft has moved forward and the tailwheel and rudder are straight.
- Please read this article and watch the video until you fully understand how the mechanism works and the mechanical sympathy you need to operate this system.
Article by Andrew Goodall
Video & Photos by David Petters
